Initiation au développement Android

Aller au contenu | Aller au menu | Aller à la recherche

vendredi, juin 28 2013

Madness - Version de beta test

Je me décide enfin à poster une version béta test ( loin d'être finalisée ) de mon jeu en GL, ceci afin d'obtenir des retours de fonctionnements sur divers matériels. Les retours les plus attendus seront par rapport à l'accéléromètre qui sur certaines tablettes et géré à l'envers !!!!! Ce qui est quand même assez étonnant. Dans le cas où votre tablette serait gérée à l'envers, merci d'utiliser l'utilitaire MyCPUInfo.apk ( en chargement ci-dessous ) et de me faire suivre le contenu de la ligne Hardware ou une copie d'écran.

Téléchargez :

Madness V0.1 - Part1
Madness V0.1 - Part2
Madness V0.1 - Part3
Madness V0.1 - Part4

MyCPUInfo.apk

Je suis ouvert à toutes vos remarques soit avec les commentaires directement sur ce site, soit par mail à androidblog@free.fr

Madness - Beta test version

I finally decide to post a beta test version (far from being finalized) of my GL game, this to obtain returns of functionings on diverse equipments. The most expected returns will be with regard to the accelerometer which on certain tablets is managed back to front!!!!! What is rather surprising. In case your tablet would be managed back to front, thank you for using the utility MyCPUInfo.apk (in download below) and make me follow the contents of the line Hardware or a screenshot.

Download:

Madness V0.1 - Part1
Madness V0.1 - Part2
Madness V0.1 - Part3
Madness V0.1 - Part4

MyCPUInfo.apk

I am opened to all your remarks either with comments directly on this site, or by e-mail at androidblog@free.fr

lundi, mars 4 2013

Je recherche un graphiste / modélisateur

Pour mon nouveau jeu, je cherche un graphiste, un modélisateur 3D, un musicien, quelqu'un intéressé pour participer à l'aventure.

Si cela vous tente, contactez-moi sur androidblog@free.fr et envoyez-moi certaines de vos réalisations.

Merci

Looking for graphist

For my new game development, I am looking for a graphic designer, a 3D modélisateur, a musician, for somebody interested to participate to the development.

If someone is interessed, please contact me at androidblog@free.fr and send me some some of your realizations.

Thanks

samedi, septembre 1 2012

Téléchargement Spacoid - version non finalisée

En développement sur un tout nouveau jeu en GL, je me décide enfin à mettre en téléchargement la version en cours ( non finalisée ) de Spacoid ( mon premier développement Java / Android ), ainsi que la version de démo de BugDash.

Téléchargez :

Spacoid V0.1 - Part1
Spacoid V0.1 - Part2
Spacoid V0.1 - Part3

BugDash V1.0 - Part1
BugDash V1.0 - Part2

MyCPUInfo.apk

Je suis ouvert à toutes vos remarques soit avec les commentaires directement sur ce site, soit par mail à androidblog@free.fr

Download Spacoid - not finalized version

In development on a new game with OPEN-GL, I decide finally to put in download the current version ( not finalized ) of Spacoid ( my first Java / Android development ), as well as the demo version of BugDash.

Download:

Spacoid V0.1 - Part1
Spacoid V0.1 - Part2
Spacoid V0.1 - Part3

BugDash V1.0 - Part1
BugDash V1.0 - Part2

MyCPUInfo.apk

I am opened to all your remarks either with comments directly on this site, or by e-mail at androidblog@free.fr

jeudi, septembre 1 2011

Introduction

Au fur et à mesure du développement, je vais présenter ici, mes recherches, les difficultés rencontrées, les diverses solutions trouvées, les solutions adoptées, le code source réalisé. Je débute en programmation Java, ainsi qu'en programmation Android. Toutes les remarques, les aides, les reproches (le moins possible j'espère), seront les bienvenus si c'est constructif et que cela fait avancer le projet, le site ou la compréhension de certains problèmes. Dans le cas contraire, si c'est critiquer pour critiquer, de la critique non constructive, allez voir ailleurs. L'adresse e-mail androidblog@free.fr a été dédiée à toutes communications en rapport avec ce site. N'hésitez pas à m'écrire. Tous les mails constructifs seront lus. Toutefois, je ne répondrais certainement pas à tout le monde.

Installation

Création d'un projet

Création d'un émulateur

Ecran de présentation

Menu principal

Installation

Création du répertoire "C:[Android|tag:Android]" dans lequel nous allons tout installer.

Pour l'installation de l'environnement de développement Eclipse, on extrait le répertoire "eclipse", contenu dans le fichier zip, dans le répertoire c:\Android. http://www.eclipse.org/downloads/download.php?file=/technology/epp/downloads/release/indigo/R/eclipse-jee-indigo-win32.zip

De même pour l'installation du SDK Android, on extrait le répertoire "android-sdk-windows", contenu dans le fichier zip, dans le répertoire c:\Android. http://dl.google.com/android/android-sdk_r12-windows.zip

Pour le développement, il faut bien que le JDK java soit installé. http://www.oracle.com/technetwork/java/javase/downloads/index.html http://download.oracle.com/otn-pub/java/jdk/6u26-b03/jdk-6u26-windows-i586.exe http://download.oracle.com/otn-pub/java/jdk/6u26-b03/jdk-6u26-windows-ia64.exe http://download.oracle.com/otn-pub/java/jdk/6u26-b03/jdk-6u26-windows-x64.exe

Il faut ensuite ajouter le chemin du SDK dans la variable PATH (chemin de recherche des programmes exécutables) de votre système. Pour cela, cliquez avec le bouton droit sur le poste de travail, puis allez dans l'onglet "Paramètres Avancés". Cliquez ensuite sur le bouton "Variables d'environnement", éditez la variable système "PATH", et ajoutez en fin de ligne le chemin vers le répertoire "tools" du SDK Android. Dans notre cas, ajoutez ";c:\Android\android-sdk-windows" et sauvegardez.

Il ne reste plus qu'à intégrer le plugin Android dans Eclipse. Exécutez le logiciel Eclipse (la première exécution est un longue). Allez dans le menu "Help/Software" Updates... Allez dans l'onglet "Available Software". Cliquez sur "Add Site..." Entrez l'adresse suivante : https://dl-ssl.google.com/android/eclipse ou http://dl-ssl.google.com/android/eclipse , puis cliquez sur OK. Retournez sur l'onglet "Available Software" Sélectionnez les composants Android à installer, puis cliquez sur "Install". Dans la fenêtre suivante, cliquez sur "Next". Acceptez le "licence agreement"; et cliquez sur "Finish". Enfin, redémarrez Eclipse.

Si un souci survenait avec le téléchargement automatique du plugin Android, vous pouvez télécharger directement le fichier ADT-12.0.0.zip (ou une version plus récente) depuis l'adresse http://dl.google.com/android/ADT-12.0.0.zip. Nous allons déposer ce fichier dans le répertoire "C:\Android[download|tag:download]" Et reprenez à l'étape Cliquez sur "Add Site...", à droite des champs où vous renseignez l'adresse, cliquez sur le bouton "Archives" et sélectionnez le fichier précédemment chargé, "C:\Android\download\ ADT-12.0.0.zip". Reprenez ensuite les étapes suivantes pour finaliser l'installation du plugin Android.

Création d'un projet

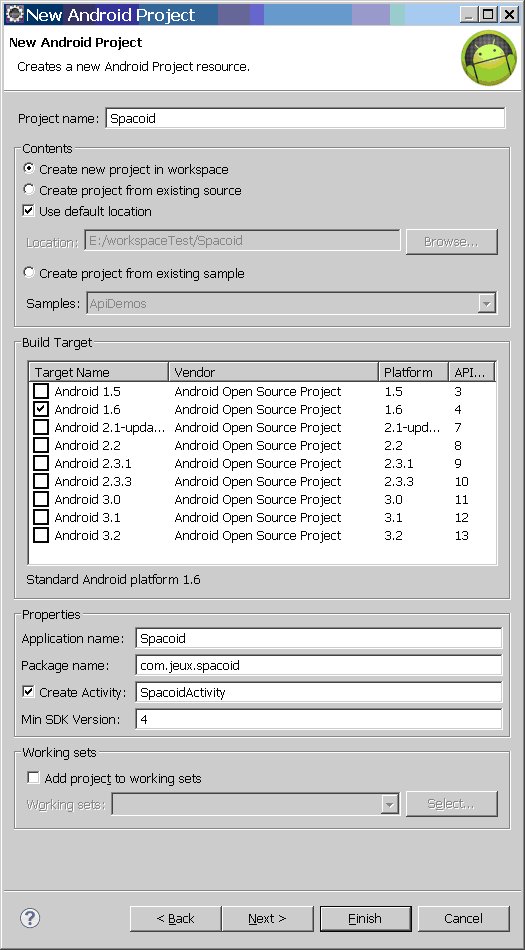
Sélectionnez "File/New/Project". Sélectionnez le type de projet "Android", puis faites "Next". Dans la fenêtre qui apparait, renseignez : "Project Name" : Nom du projet. "Package Name" : Spécifiez le nom du package Java. Le fait de créer une "Activity" nécessite de spécifier le nom de la classe qui sera l'Activity initiale et le nom de l'application "Application Name". "Min SDK Version" permet de spécifier la version minimun du SDK sur laquelle l'application fonctionnera

The Android version 1.6 (Donut) is version 4. The 2.0 (Eclair) SDK is version 5. The 2.1 is version 7… Pour plus d’information, voir http://developer.android.com/guide/appendix/api-levels.html.

Il peut arriver que la liste des différentes versions d'Android soit vide, ce qui bloque pour la création du projet. Quittez la création du projet, et allez dans "Windows/Preference". Sélectionnez "Android", dans la fenêtre de droite, renseignez "SDK Location :" avec le chemin complet pour accéder au SDK Android que vous avez installé. Dans notre cas "C:\Android\ android-sdk-windows " Vous pouvez relancer la création du nouveau projet, la liste est maintenant renseignée.


00_-_03_-_Creation_Du_Projet.jpg

Création d'un émulateur

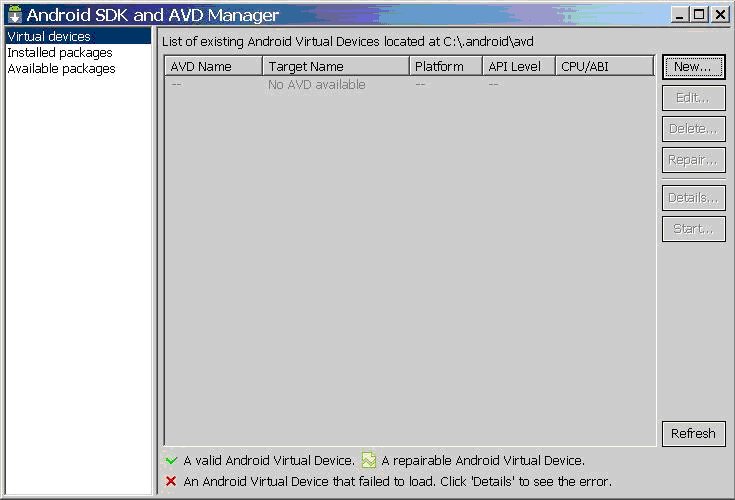
Dans le menu "Eclipse/Windows", sélectionnez "Android SDK and AVD manager"

00_-_03_-_Creation_D__Un_Emulateur_-_01.jpg

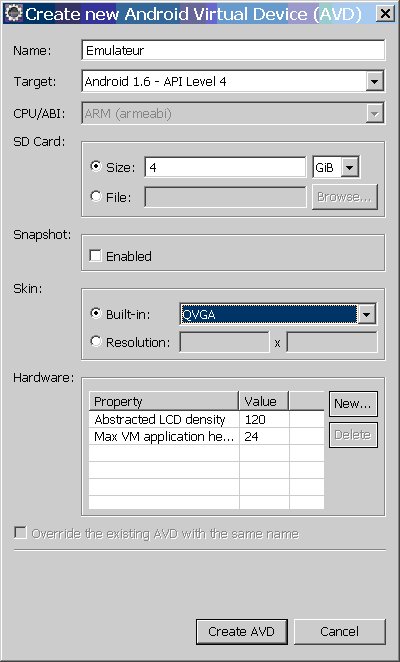
Cliquez sur "New", la fenêtre suivante s’ouvre :

00_-_03_-_Creation_D__Un_Emulateur_-_02.jpg

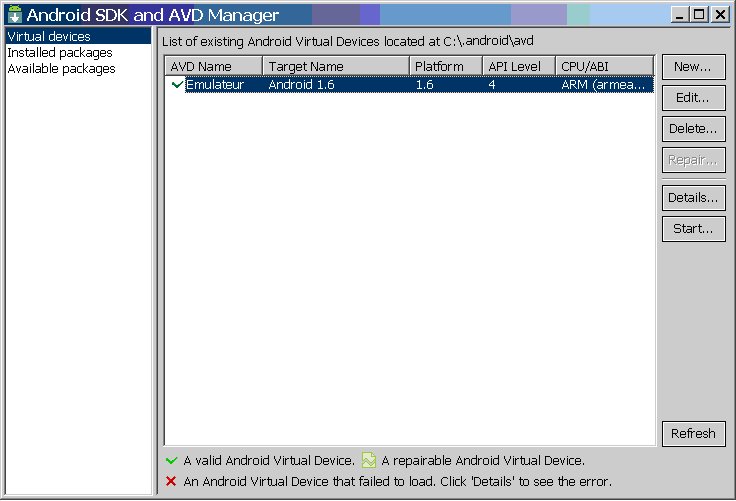
Renseignez les divers champs comme ci-dessus, par exemple, et cliquez sur "Create AVD". La création peut prendre un certain temps, alors soyez patient. Lorsque la création du nouvel émulateur sera réalisée, vous vous retrouverez sur la fenêtre précédente.

00_-_03_-_Creation_D__Un_Emulateur_-_03.jpg

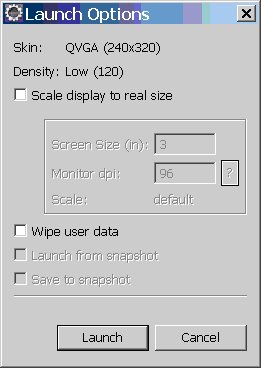
Vous pouvez donc sélectionner l’émulateur créé et le mettre en marche en appuyant sur "Start…". La fenêtre suivante s’ouvre, cliquez directement sur "Launch".

00_-_03_-_Creation_D__Un_Emulateur_-_04.jpg

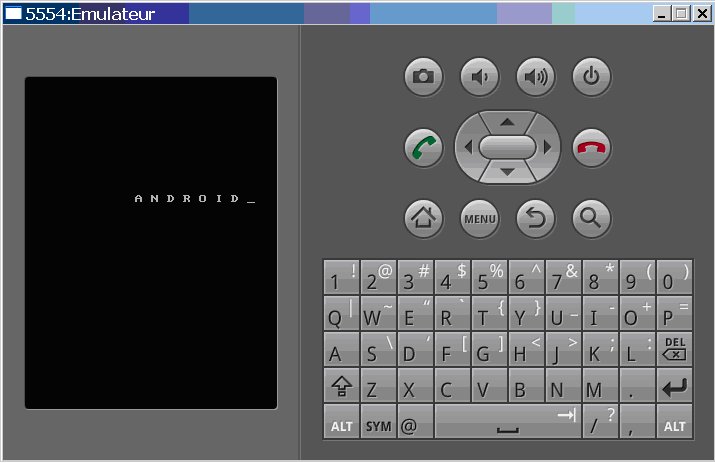
La fenêtre de l’émulateur s’ouvre alors.

00_-_03_-_Creation_D__Un_Emulateur_-_05.jpg

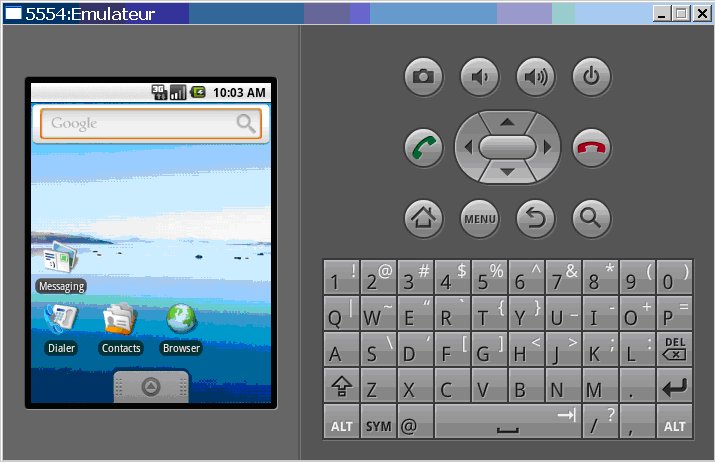
Et une fois Android démarré.

00_-_03_-_Creation_D__Un_Emulateur_-_06.jpg

Ecran de présentation

Nous allons débuter l’application par un écran de présentation, splash-screen comme cela est appelé. Cet écran nous permettra par la suite de pré-charger un certain nombre de ressources utilisées dans la suite de l’application. De plus cet écran de présentation ne réapparaitra pas lorsque vous cliquerez sur le bouton précédent, cela quittera simplement l’application sans réafficher cet écran.

Donc nous allons afficher une image pendant quelques instants avant d’afficher le menu principal du jeu.

Nous allons reprendre le tutorial de barebonescoder à l’adresse http://www.barebonescoder.com/2010/04/a-simple-android-splash-screen/ ) .

Nous allons commencer par créer le fichier splashscreen.xml qui décrira ce qui devra être affiché sur notre écran. Pour cela, sur l’item layout de notre projet, avec le bouton droit, nous faisons new/file pour ajouter le fichier XML que nous nommons splashscreen.xml. Dans ce fichier, nous ajoutons le code suivant :

<?xml version="1.0" encoding="utf-8"?>
<LinearLayout
xmlns:android="http://schemas.android.com/apk/res/android"
android:gravity="center_horizontal|center_vertical"
android:orientation="vertical"
android:layout_width="fill_parent"
android:layout_height="fill_parent"
android:background="@drawable/spacoid">
<TextView
android:layout_height="wrap_content"
android:text="LOADING"
android:id="@+id/textView1"
android:layout_width="wrap_content"
android:textAppearance="?android:attr/textAppearanceLarge"/>
</LinearLayout>

Avec ce code, nous ajoutons donc un LinearLayout dans lequel nous positionnons en fond d’écran ( background ) notre image de présentation "@drawable/spacoid".

Nous allons mettre à jour le fichier AndroidManifest, afin de définir correctement l’écran de notre application

<?xml version="1.0" encoding="utf-8"?>
<manifest xmlns:android="http://schemas.android.com/apk/res/android"
      package="com.jeux.splashscreen"
      android:versionCode="1"
      android:versionName="1.0">
    <uses-sdk android:minSdkVersion="4" />

    <application android:icon="@drawable/icon" android:label="@string/app_name">
        <activity android:label="@string/app_name"
		android:theme="@android:style/Theme.NoTitleBar.Fullscreen"
		android:screenOrientation="portrait"
		android:name="SplahScreenActivity">
            <intent-filter>
                <action android:name="android.intent.action.MAIN" />
                <category android:name="android.intent.category.LAUNCHER"/>
            </intent-filter>
        </activity>
    </application>
</manifest>

Au passage, avec les lignes suivantes :

android:theme="@android:style/Theme.NoTitleBar.Fullscreen" android:screenOrientation="portrait"

Nous forçons l’affichage en mode portrait, ainsi que l’affichage en plein écran en supprimant la barre d’état en haut de l’écran.

Il ne reste plus qu’à ajouter le code permettant l’affichage de cet écran de présentation avec le code suivant :

package com.jeux.splashscreen;

import android.app.Activity;
import android.os.Bundle;

public class SplahScreenActivity  extends Activity
{
	/** Called when the activity is first created. */
	@Override
	public void onCreate( Bundle savedInstanceState )
	{
		// Must be first instruction of onCreate.
		super.onCreate( savedInstanceState );
		// Show Splash screen.
		setContentView( R.layout.splashscreen );
		// Create and run thread.
		Thread splashThread = new Thread()
		{
			@Override
			public void run()
			{
				try
				{
					int waited = 0;

					while( waited < 5000 )
					{
						sleep( 50 );
						waited += 100;
					}
				}
				catch( InterruptedException e )
				{
					e.printStackTrace();
				}
				finally
				{
					finish();
				}
			}
		};
		splashThread.start();
	}
}

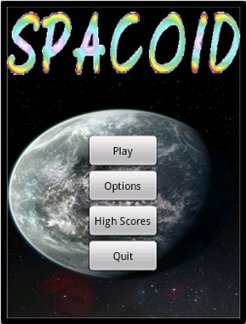
Après exécution, nous obtenons l’affichage suivant, pendant quelques secondes, puis l’application se termine :

01_-_SplashScreen.jpg

Télécharger l'archive.

Menu Principal

Dans ce nouvel épisode, nous allons nous occuper du menu général du jeu, qui devra apparaître après l’écran de présentation et qui ressemblera à ceci :


02_-_MainMenu.jpg

Nous allons donc créer dans le répertoire « res/layout », un nouveau fichier nommé mainmenu.xml, dans lequel nous allons définit le fond d’écran, le titre et les 4 boutons, de la manière suivante :

<?xml version="1.0" encoding="utf-8"?>
<LinearLayout xmlns:android="http://schemas.android.com/apk/res/android"
	android:orientation="vertical"
	android:gravity="center_horizontal"
	android:layout_width="fill_parent"
	android:layout_height="fill_parent"
	android:background="@drawable/main_screen">
	<ImageView
		android:src="@drawable/title_original_01"
		android:id="@+id/imageView1"
		android:layout_width="wrap_content"
		android:layout_height="wrap_content"/>
	<ImageView
		android:layout_width="wrap_content"
		android:id="@+id/imageView2"
		android:layout_height="75dp"/>
	<Button
		android:gravity="center_vertical|center_horizontal"
		android:layout_height="wrap_content"
		android:id="@+id/main_play_button"
		android:text="@string/main_play"
		android:layout_width="@dimen/main_button_width"
		android:onClick="main_play_button_onClick"/>
 	<Button
		android:gravity="center_vertical|center_horizontal"
		android:layout_height="wrap_content"
		android:id="@+id/main_options_button"
		android:text="@string/main_options"
		android:layout_width="@dimen/main_button_width"
		android:onClick="main_options_button_onClick"/>
	<Button
		android:gravity="center_vertical|center_horizontal"
		android:layout_height="wrap_content"
		android:id="@+id/main_highscore_button"
		android:text="@string/main_highscore"
		android:layout_width="@dimen/main_button_width"
		android:onClick="main_highscore_button_onClick"/>
	<Button
		android:gravity="center_vertical|center_horizontal"
		android:layout_height="wrap_content"
		android:id="@+id/main_quit_button"
		android:text="@string/main_quit"
		android:layout_width="@dimen/main_button_width"
		android:onClick="main_quit_button_onClick"/>
</LinearLayout>

Nous créons donc un LinearLayout qui contiendra les différents objets, avec l’attribut android:gravity positionné à center_horizontal, pour centrer les objets les uns sous les autres, et dans lequel nous mettons notre image « @drawable/main_screen » en background. Nous ajoutons ensuite un premier « ImageView » afin d’afficher l’image correspondant au titre de notre jeu. Nous mettons un deuxième « ImageView » vide afin de laisser un espace entre le titre est les boutons dessous. Puis nous définissons les 4 boutons avec l’attribut « android:onClick » renseigné avec le nom de la fonction gérant l’action du bouton.


Dans « res/values », nous allons ajouter diverses définitions et divers identifiants,

Dans « res/values/dimens.xml » :

<resources>
    <dimen name="gfont_en_font_h">18.0px</dimen>
    <dimen name="main_button_width">100.0dp</dimen>
    <dimen name="main_layout_y">80.0px</dimen>
</resources>

Dans « res/values/ids.xml » :

<resources>
    <item type="id" name="highscore_title">false</item>
    <item type="id" name="main_play_button">false</item>
    <item type="id" name="main_options_button">false</item>
    <item type="id" name="main_highscore_button">false</item>
    <item type="id" name="main_quit_button">false</item>
</resources>

Dans « res/values/strings.xml » :

<?xml version="1.0" encoding="utf-8"?>
<resources>
    <string name="app_name">Spacoid</string>
    <string name="main_highscore">High Scores</string>
    <string name="main_options">Options</string>
    <string name="main_play">Play</string>
    <string name="main_quit">Quit</string>
</resources>

Nous allons mettre à jour le fichier AndroidManifest.xml afin de définir la nouvelle activité qui s’ouvrira pour afficher le menu de sélection du jeu.

<?xml version="1.0" encoding="utf-8"?>
<manifest
    xmlns:android="http://schemas.android.com/apk/res/android"
    package="com.jeux.mainmenu"
    android:versionCode="1"
    android:versionName="1.0">
    <uses-sdk android:minSdkVersion="4" />
    <application
        android:icon="@drawable/icon"
        android:label="@string/app_name">
        <activity
            android:name="MainMenuActivity"
            android:label="@string/app_name"
            android:screenOrientation="portrait"
            android:theme="@android:style/Theme.NoTitleBar.Fullscreen">
            <intent-filter>
               <action android:name="android.intent.action.MAIN" />
               <category android:name="android.intent.category.LAUNCHER"/>
            </intent-filter>
        </activity>
        <activity
            android:name="MainMenu" 
            android:screenOrientation="portrait"
            android:theme="@android:style/Theme.NoTitleBar.Fullscreen"/>
    </application>
</manifest>

Enfin nous allons créer une nouvelle classe qui affichera le menu et gèrera les différents boutons. Sur « src/com.jeux.mainmenu », nous créons le nouveau fichier MainMenu.java, qui contiendra :

package com.jeux.mainmenu;

import android.app.Activity;
import android.content.Intent;
import android.os.Bundle;
import android.view.View;

public class MainMenu extends Activity {
	@Override
	public void onCreate(Bundle savedInstanceState) {
		super.onCreate(savedInstanceState);
		setContentView(R.layout.mainmenu);
	}

	public void main_play_button_onClick(View v){}

	public void main_options_button_onClick(View v){}

	public void main_highscore_button_onClick(View v) {}

	public void main_quit_button_onClick(View v)
{
		finish();
	}
}

Dans la fonction « onCreate », nous affichons le layout « R.layout.mainmenu » correspondant à l’affichage désiré, comme vu plus au. Puis nous créons une fonction pour chaque callback associé aux boutons présents dans le menu :

main_play_button_onClick : Cette fonction sera appelée lors de la sélection du bouton “Play” et lancera le jeu. main_options_button_onClick : Cette fonction sera appelée lors de la sélection du bouton “Options” et permettra d’accéder aux options de son, RAZ du score et quelques informations sur le jeu. main_highscore_button_onClick : Cette fonction sera appelée lors de la sélection du bouton “High Scores” qui affichera l’écran des meilleurs scores. main_quit_button_onClick : Cette fonction sera appelée lors de la sélection du bouton “Quit” qui terminera l’activité et quittera l’application.

Télécharger l'archive.

mercredi, août 31 2011

Introduction

According to the development, I am going to present here, my researches, the difficulties, the various solutions and thoseadopted and the source code. I begin in programming Java, as well as in programming Android. All the remarks, the helps, the criticism (the least possible I hope), will be welcome if it is constructive and if it advances the project, the site or the understanding of certain problems. Should the opposite occur, if it is to criticize for criticizing, or not constructive criticism, go to visit somewhere else.

The e-mail address androidblog@free.fr was dedicated to any communications in touch with this site. Do not hesitate to write me. All the constructive e-mails will be read. However, I would not certainly answer everybody.

Installation

Project creation

Splash Screen

Installation

Creation of the directory " C:\Android " in which we are going to install everything.

For the installation of the eCLIPSE development environment, we extract the directory " eclipse ", contained in the zip file, in the directory c:\Android. Http://www.eclipse.org/downloads/download.php?Line=/technology/epp/downloads/release/indigo/R/eclipse-jee-indigo-win32.zip

Also for the installation of the Android SDK, we extract the directory " android-sdk-windows ", contained in the zip file, in the directory c:\Android. Http: // dl.google.com/android/android-sdk_r12-w indows.zip

For the development, the JDK Java has to be installed. http://www.oracle.com/technetwork/java/javase/downloads/index.html http://download.oracle.com/otn-pub/java/jdk/6u26-b03/jdk-6u26-windows-i586.exe http://download.oracle.com/otn-pub/java/jdk/6u26-b03/jdk-6u26-windows-ia64.exe http://download.oracle.com/otn-pub/java/jdk/6u26-b03/jdk-6u26-windows-x64.exe

It is then necessary to add the path of the SDK in the PATH variable of your system. For that purpose, click with the right button on your workstation icon, then go to the tab " Advanced Parameters ". Click the button " Variables of environment ", edit the variable system " PATH ", and add at the end of line the path towards the directory " tools " of the SDK Android. In our case, add "; c:\Android\android-sdk-windows " and apply.

We have to integrate the Android plugin into Eclipse. Execute the Eclipse software (the first execution may be long ). Go to the menu "Help / software Updates..." Go to the tab " Available Software ". Click " Add Site... " Enter the following address: https://dl-ssl.google.com/android/eclipse or http://dl-ssl.google.com/android/eclipse, then click on OK.

Return on the tab " Available Software " Select Android components to be installed, then click "Install". In the following window, click "Next". Accept " license agreement "; and click "Finish". Finally, restart Eclipse.

If an error arose with the automatic download of the plugin Android, you can download directly the file ADT-12.0.0.zip (or a more recent version) from the address http://dl.google.com/android/ADT-12.0.0.zip. You save this file in the directory " C:\Android\download "

You start in the stage Click "Add Site", to the right of the fields where you inform the address, click the button "Archives" and select the file previously loaded, " C:\Android\download\ ADT-12.0.0.zip ". Then resume the following stages to finalize the installation of the plugin Android.

Project creation

Select "File/New/Project". Select the type of project "Android", then make "Next". In the window which appears, inform: "Project Name": name of the project. "Package Name": specify the name of the Java package. The fact of creating "Activity" requires to specify the name of the class which will be initial Activity and name of the application "Application Name". "Min SDK version" allows to specify the minimun version of the SDK on which the application will work.

The Android version 1.6 ( Donut) is version 4. The 2.0 (Eclair) SDK is version 5. The 2.1 is version 7 … For more information, see http://developer.android.com/guide/appendix/api-levels.html.

He may arrive that the list of the various versions of Android is empty, what blocks for the creation of the project. Leave the creation of the project, and go to "Windows/Preference". Select "Android", in the right window, inform "SDK Location :" with the complete path to reach the SDK Android

You can relaunch the creation of the new project, the list is now informed.

Emulator definition

1. Emulator definition

In Eclipse/Windows menu , select "Android SDK and AVD manager"

00_-_03_-_Creation_D__Un_Emulateur_-_01.jpg

Click on "New", this window opens :

00_-_03_-_Creation_D__Un_Emulateur_-_02.jpg

Inform the diverse fields as above, for example, and click "Create AVD". The creation can take certain time, then be patient. When the creation of the new emulator is realized, you are taken back on the previous window.

00_-_03_-_Creation_D__Un_Emulateur_-_03.jpg

You can now select the created emulator and start it up by pressing on "Start". The following window opens, click directly "Launch".

00_-_03_-_Creation_D__Un_Emulateur_-_04.jpg

The window of the emulator opens.

00_-_03_-_Creation_D__Un_Emulateur_-_05.jpg

And then after Android is started.

00_-_03_-_Creation_D__Un_Emulateur_-_06.jpg

Splash Screen

We are going to begin the application with a presentation screen, called splash screen. This screen will allow us afterward to pre-load a lot of resources used during the application. This presentation screen will not appear when you will click the previous button, it will leave simply the application without re-posting this screen.

Thus we are going to show an image during a few moments before showing the main menu of the game.

We are going to resume(to take back) the tutorial of barebonescoder at the address : http://www.barebonescoder.com/2010/04/a-simple-android-splash-screen/ ) .

We begin by creating the “splashscreen.xml” file which will describe what must be shown on our screen. For that purpose, on the layout item of our project, with the right button, we make new / file to add a XML file which we name splashscreen.xml. In this file, we add the following code:

<?xml version="1.0" encoding="utf-8"?> <LinearLayout xmlns:android="http://schemas.android.com/apk/res/android" android:gravity="center_horizontal|center_vertical" android:orientation="vertical" android:layout_width="fill_parent" android:layout_height="fill_parent" android:background="@drawable/spacoid"> <TextView android:layout_height="wrap_content" android:text="LOADING" android:id="@+id/textView1" android:layout_width="wrap_content" android:textAppearance="?android:attr/textAppearanceLarge"/> </LinearLayout>

With this code, we add a LinearLayout in which we position in background our presentation image "@drawable / spacoid".

We are going to update the file AndroidManifest, to define correctly the screen of our application.

<?xml version="1.0" encoding="utf-8"?> <manifest xmlns:android="http://schemas.android.com/apk/res/android"

     package="com.jeux.splashscreen"
     android:versionCode="1"
     android:versionName="1.0">
   <uses-sdk android:minSdkVersion="4" />
   <application android:icon="@drawable/icon" android:label="@string/app_name">
       <activity android:label="@string/app_name"

android:theme="@android:style/Theme.NoTitleBar.Fullscreen" android:screenOrientation="portrait" android:name="SplahScreenActivity">

           <intent-filter>
               <action android:name="android.intent.action.MAIN" />
               <category android:name="android.intent.category.LAUNCHER"/>
           </intent-filter>
       </activity>
   </application>

</manifest>

Il ne reste plus qu’à ajouter le code permettant l’affichage de cet écran de présentation avec le code suivant :

With the following lines:

android:theme="@android:style/Theme.NoTitleBar.Fullscreen" android:screenOrientation="portrait"

we force the display in portrait mode, as well as the display in full screen by eliminating the status bar at the top of the screen.

It remains to add the code allowing the display of this presentation screen with the following code:

package com.jeux.splashscreen;

import android.app.Activity; import android.os.Bundle;

public class SplahScreenActivity extends Activity { /** Called when the activity is first created. */ @Override public void onCreate( Bundle savedInstanceState ) { // Must be first instruction of onCreate. super.onCreate( savedInstanceState ); // Show Splash screen. setContentView( R.layout.splashscreen ); // Create and run thread. Thread splashThread = new Thread() { @Override public void run() { try { int waited = 0;

while( waited < 5000 ) { sleep( 50 ); waited += 100; } } catch( InterruptedException e ) { e.printStackTrace(); } finally { finish(); } } }; splashThread.start(); } }

After execution, we obtain the following display, during some seconds, then the application ends:


01_-_SplashScreen.jpg

Download corresponding archive.
Main Menu

In this new episode, we are going to take care of the general menu of the game, which will appear after the presentation screen and will look like this:

02_-_MainMenu.jpg

We begin by creating in the directory « res / layout », a new file named « mainmenu.xml », in which we define the background of screen, the title and 4 buttons, in the following way:

<?xml version="1.0" encoding="utf-8"?>
<LinearLayout xmlns:android="http://schemas.android.com/apk/res/android"
	android:orientation="vertical"
	android:gravity="center_horizontal"
	android:layout_width="fill_parent"
	android:layout_height="fill_parent"
	android:background="@drawable/main_screen">
	<ImageView
		android:src="@drawable/title_original_01"
		android:id="@+id/imageView1"
		android:layout_width="wrap_content"
		android:layout_height="wrap_content"/>
	<ImageView
		android:layout_width="wrap_content"
		android:id="@+id/imageView2"
		android:layout_height="75dp"/>
	<Button
		android:gravity="center_vertical|center_horizontal"
		android:layout_height="wrap_content"
		android:id="@+id/main_play_button"
		android:text="@string/main_play"
		android:layout_width="@dimen/main_button_width"
		android:onClick="main_play_button_onClick"/>
 	<Button
		android:gravity="center_vertical|center_horizontal"
		android:layout_height="wrap_content"
		android:id="@+id/main_options_button"
		android:text="@string/main_options"
		android:layout_width="@dimen/main_button_width"
		android:onClick="main_options_button_onClick"/>
	<Button
		android:gravity="center_vertical|center_horizontal"
		android:layout_height="wrap_content"
		android:id="@+id/main_highscore_button"
		android:text="@string/main_highscore"
		android:layout_width="@dimen/main_button_width"
		android:onClick="main_highscore_button_onClick"/>
	<Button
		android:gravity="center_vertical|center_horizontal"
		android:layout_height="wrap_content"
		android:id="@+id/main_quit_button"
		android:text="@string/main_quit"
		android:layout_width="@dimen/main_button_width"
		android:onClick="main_quit_button_onClick"/>
</LinearLayout>

We create a LinearLayout which will contain the various objects, with the attribute android:gravity positioned in center_horizontal, to center objects one under the other, and in which we put our background image "@drawable / main_screen". We add a first "ImageView" to show the image of the name of the game. We put a second "ImageView" empty to leave a space between the title and the buttons below. Then we define 4 buttons with attribute "android:onClick" informed with the name of the function managing the action of the button.

In « res/values »,, we add diverse definitions and diverse identifiers,

In « res/values/dimens.xml » :

<resources>
    <dimen name="gfont_en_font_h">18.0px</dimen>
    <dimen name="main_button_width">100.0dp</dimen>
    <dimen name="main_layout_y">80.0px</dimen>
</resources>

In « res/values/ids.xml » :

<resources>
    <item type="id" name="highscore_title">false</item>
    <item type="id" name="main_play_button">false</item>
    <item type="id" name="main_options_button">false</item>
    <item type="id" name="main_highscore_button">false</item>
    <item type="id" name="main_quit_button">false</item>
</resources>

In « res/values/strings.xml » :

<?xml version="1.0" encoding="utf-8"?>
<resources>
    <string name="app_name">Spacoid</string>
    <string name="main_highscore">High Scores</string>
    <string name="main_options">Options</string>
    <string name="main_play">Play</string>
    <string name="main_quit">Quit</string>
</resources>

We update the file AndroidManifest.xml to define the new activity which will open to show the main menu of the game.

<?xml version="1.0" encoding="utf-8"?>
<manifest
    xmlns:android="http://schemas.android.com/apk/res/android"
    package="com.jeux.mainmenu"
    android:versionCode="1"
    android:versionName="1.0">
    <uses-sdk android:minSdkVersion="4" />
    <application
        android:icon="@drawable/icon"
        android:label="@string/app_name">
        <activity
            android:name="MainMenuActivity"
            android:label="@string/app_name"
            android:screenOrientation="portrait"
            android:theme="@android:style/Theme.NoTitleBar.Fullscreen">
            <intent-filter>
               <action android:name="android.intent.action.MAIN" />
               <category android:name="android.intent.category.LAUNCHER"/>
            </intent-filter>
        </activity>
        <activity
            android:name="MainMenu" 
            android:screenOrientation="portrait"
            android:theme="@android:style/Theme.NoTitleBar.Fullscreen"/>
    </application>
</manifest>

Finally we create a new class which will post the menu and will manage the various buttons. In « src/com.jeux.mainmenu », we create the new file MainMenu.java, which will contain:

package com.jeux.mainmenu;

import android.app.Activity;
import android.content.Intent;
import android.os.Bundle;
import android.view.View;

public class MainMenu extends Activity {
	@Override
	public void onCreate(Bundle savedInstanceState) {
		super.onCreate(savedInstanceState);
		setContentView(R.layout.mainmenu);
	}

	public void main_play_button_onClick(View v){}

	public void main_options_button_onClick(View v){}

	public void main_highscore_button_onClick(View v) {}

	public void main_quit_button_onClick(View v)
{
		finish();
	}
}

In the « onCreate » function, we show the layout " R.layout.mainmenu " corresponding to the display. Then we create a function for every callback associated with the present buttons in the menu:

main_play_button_onClick This function will be called on the selection of the button " Play " and will launch the game. main_options_button_onClick This function will be called on the selection of the button "Options" and will allow to reach the options of sound, RAZ of the score and some information on the game. main_highscore_button_onClick This function will be called on the selection of the button " High Scores " which will show the high scores screen. main_quit_button_onClick This function will be called on the selection of the button " Quit " which will end the activity and will leave the application.

download archive.